Showing posts with label SharePoint. Show all posts

Monday, 9 January 2012

Activate & Deactivate infopath form using PowerShell or CMD in SharePoint


our new blog site : http://blog.hintechnology.com
Activate and Deactivate Infopath Form using Powershell or CMD in SharePoint

1. Deactivate Infopath form, from the Site Collection.
    stsadm.exe -o deactivateFormTemplate -url "http://demosite" -filename               "D:\InfoPathForms\PublishFiles\DemoSample.xsn"

2. Activate Infopath form, from the Site Collection.

    stsadm.exe -o activateFormTemplate -url "http://demosite" -filename    "D:\InfoPathForms\PublishFiles\DemoSample.xsn" 

3. Verify Infopath form 

    stsadm.exe -o verifyformtemplate -filename  "D:\InfoPathForms\PublishFiles\DemoSample.xsn"  

4. Verify Infopath form  

    stsadm.exe -o UpgradeFormTemplate -filename  "D:\InfoPathForms\PublishFiles\DemoSample.xsn" 

Thank You For Reading this Blog

Thursday, 5 January 2012

User Control in SharePoint using ASP.NET Solution

our new blog site : http://blog.hintechnology.com

Create and Deploy user Control of ASP.NET Solution in SharePoint
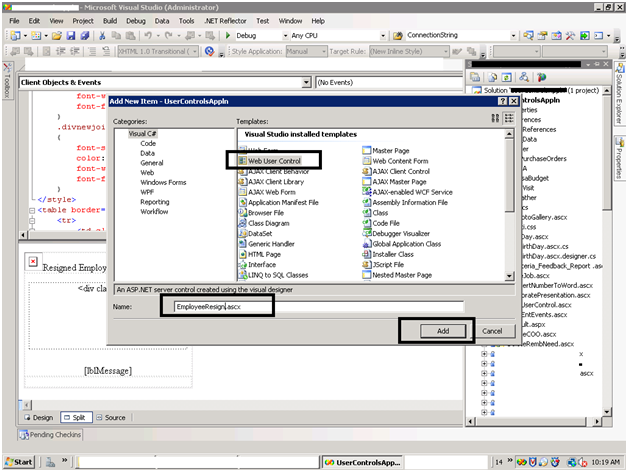
1.       1. Add User Control in Asp.net  Application


2.       Design your User Control with controls

3.       you can have the Design of the Form

<style type="text/css">
    .divMainJoinee
    {
        width: 260px;
        margin: 0px;
        padding: 0px;
    }
    .divnewjoin
    {
        float: left;
    }
    .divnewjoin-photo
    {
        margin: 2px;
        padding-left: 10px;
        float: left;
        width: 75px;
        height: 100px;
    }
    .divnewjoin-desc
    {
        float: left;
        width: 160px;
        height: 100px;
        padding-left: 10px;
    }
    .divnewjoin-desc > p
    {
        line-height: 20px;
        overflow: hidden;
        padding-left: 5px;
        margin: 0px;
        font-size: 10px;
        color: #294592;
        font-weight: bold;
        font-family: Verdana;
    }
    .divnewjoin-desc > p > a
    {
        font-size: 10px;
        color: #294592;
        font-weight: bold;
        font-family: Verdana;
    }
</style>
<table border="0" width="275px" cellpadding="0" class="birthbg" cellspacing="0">
    <tr>
        <td class="BDtblleft" style="font-size: 12pt; font-family: Frutiger LT 45 Light">
            <img style="height: 30px; width: 30px" src="/SiteImageLibrary/resign_employee_png.png" alt="Resigned Employee!" />Resigned
            Employee
        </td>
    </tr>
    <tr align="center">
        <td colspan="2">
            <div style="text-align: center;" class="BDtblBody">
                <asp:Repeater ID=" rptRegisnationEMP" runat="server">
                    <HeaderTemplate>
                        <div style="width: 260px; height: 140px; margin: 5px">
                            <marquee direction='up' onmouseover='this.scrollAmount=0' onmouseout='this.scrollAmount=2'
                                scrollamount="2" style='padding-top: 10px; height: 110px; padding-bottom: 10px;'>
                    <div class="divMainJoinee">
                    </HeaderTemplate>
                    <ItemTemplate>
                        <div class="divnewjoin">
                            <div class="divnewjoin-photo">
                                <img src='<%# Eval("EMP_PHOTO")%>' width="75px" height="100px" alt="Employee Name" />
                            </div>
                            <div class="divnewjoin-desc">
                                <p>
                                    <a href='<%# Eval("EMP_EMAIL", "mailto:{0}" ) %>'>
                                        <%# Eval("EMP_NAME")%>
                                    </a>
                                    <br />
                                    DEPT :
                                    <%# Eval("DEPT_NAME")%>
                                    <br />
                                    DESG :
                                    <%# Eval("DESIG_NAME")%>
                                    <br />
                                    LAST WORKING DATE :
                                    <%# Eval("EMP_LASTWORKINGDAY", "{0:dd/M/yyyy}")%>
                                </p>
                            </div>
                        </div>
                    </ItemTemplate>
                    <SeparatorTemplate>
                        <div style="clear: both;">
                            <br />
                        </div>
                    </SeparatorTemplate>
                    <FooterTemplate>
                        </div> </marquee> </div>
                    </FooterTemplate>
                </asp:Repeater>
                <asp:Label ID="lblMessage" runat="server" Text=""></asp:Label>
            </div>
        </td>
    </tr>
    <tr>
        <td style="height: 5px;">
        </td>
    </tr>
</table>

4.       The Code Behind File of the User Control Binds the Data to the Repeater Control

using System;
using System.Configuration;
using System.Data;
using System.Data.SqlClient;

namespace  MyNameSpace
{
    public partial class EmployeeResign : System.Web.UI.UserControl
    {
        #region User Control Level Variable

        string ConnectionString = ConfigurationManager.AppSettings["ConnectionString"].ToString();
        SqlConnection objConn;
        SqlCommand objCmd;

        #endregion

        protected void Page_Load(object sender, EventArgs e)
        {
            if (!IsPostBack)
            {
                BindData();
            }
        }

        #region Bind Data

        protected void BindData()
        {
            objConn = new SqlConnection(ConnectionString);

            try
            {
                objConn.Open();

                objCmd = new SqlCommand("GETEMPRESIGNATION", objConn);

                DataTable objtblResignatioEmp = new DataTable();
                SqlDataAdapter objadpNewJoinee = new SqlDataAdapter(objCmd);
                objadpNewJoinee.Fill(objtblResignatioEmp);

                if (objtblNewJoinee.Rows.Count > 0)
                {
                    rptRegisnationEMP.DataSource = objtblResignatioEmp
                    rptRegisnationEMP.DataBind();
                }
                else
                {
                    lblMessage.Text = "No Record Found";
                }
            }
            catch (Exception es)
            {
                lblMessage.Text = es.Message;
            }
            finally
            {
                objConn.Close();
            }
        }
        #endregion
    }
}

5.       Build the Solution
6.       Create User Control folder in the IIS Directory of the SharePoint Site.

7.       Add your user control file in the “UserControls” files which you have recently created.


8.       Deploy the Asp.NET DLL of the Solution in the GAC, and Add in the Web Config files of the sharepoint Site.
“<SafeControl Assembly="Put_Your_Assembly_Details", Version=1.0.0.0, Culture=neutral, PublicKeyToken=e28cff1753813c3e" Namespace="Your_Solution_Namespace" TypeName="*" Safe="True" />  
9.       Now Edit the SharePoint Page, where you want to add this user control, SMARTPART is one of the free Web Parts through which we can Add your usercontrol Directly so ADD SMARTPART Web Part in your Farm Solution, and Add the Smart Part Web Part in the Editing Page.


10.   Edit the Smart Page Web Part and Select the Your UserControl Name from the Drop Down List.


 Thank you for Reading Post.

Tuesday, 3 January 2012

Web Part Page Property in SharePoint

our new blog site : http://blog.hintechnology.com
Create Custom SharePoint Web Part Property.
In this example i have created custom page viewer Web Part
1. I have created  a Visual Web Part, and have added the following in this Web Part Pages.

   a) Add the following Code in the WebPart.cs File of the Visual Web Part as Displayed below

[ToolboxItemAttribute(false)]
    public class CustomPageViewerWebPart : WebPart
    {
        // Visual Studio might automatically update this path when you change the Visual Web Part project item.
        private const string _ascxPath = @"~/_CONTROLTEMPLATES/CustomPageViewer/CustomPageViewerWebPart/CustomPageViewerWebPartUserControl.ascx";

        [WebBrowsable(true),
         Category("Miscellaneous"),
         Personalizable(PersonalizationScope.Shared),
         WebDisplayName("Enter URL")]
        public string PageURL { get; set; }

        [WebBrowsable(true),
         Category("Miscellaneous"),
         Personalizable(PersonalizationScope.Shared),
         WebDisplayName("PageHeight")]
        public string PageHeight { get; set; }

        [WebBrowsable(true),
         Category("Miscellaneous"),
         Personalizable(PersonalizationScope.Shared),
         WebDisplayName("PageWidth")]
        public string PageWidth { get; set; }


        protected override void CreateChildControls()
        {
            CustomPageViewerWebPartUserControl control = Page.LoadControl(_ascxPath) as      CustomPageViewerWebPartUserControl;
            Controls.Add(control);

            if (control != null)
                control.CustomPVWebPart = this;
            Controls.Add(control);
        }
    }


  b) Add the Following Design in the User Control Page


<div id="divIframe" visible="false" runat="server">
    <iframe src="http://www.google.com" width="100%" height="100%" runat="server" id="customiframe">
    </iframe>
</div>
<div id="divMessage" visible="true" runat="server">
    <asp:Label ID="lblMessage" runat="server" Text=""> </asp:Label>
</div>


    c) Add the following code in the Code Behind file of the Web Part 


    public partial class CustomPageViewerWebPartUserControl : UserControl
    {
        protected void Page_Load(object sender, EventArgs e)
        {
        }

        public CustomPageViewerWebPart CustomPVWebPart { get; set; }

        protected override void OnPreRender(EventArgs e)
        {
            base.OnPreRender(e);
            try
            {
                if (this.CustomPVWebPart != null && this.CustomPVWebPart.PageURL != null
                    && this.CustomPVWebPart.PageHeight != null && this.CustomPVWebPart.PageWidth != null)
                {
                    divIframe.Visible = true;
                    divMessage.Visible = false;
                    customiframe.Attributes.Add("src", this.CustomPVWebPart.PageURL);
                    customiframe.Attributes.Add("width", this.CustomPVWebPart.PageWidth);
                    customiframe.Attributes.Add("height", this.CustomPVWebPart.PageHeight);
                }
                else
                {
                    divIframe.Visible = false;
                    divMessage.Visible = true;
                    lblMessage.Text = "no page is referred";
                }
            }
            catch (Exception ex)
            {
                divIframe.Visible = false;
                divMessage.Visible = true;
                lblMessage.Text = ex.Message;
            }
        }
    }


OutPut


Thanks for Reading this Blog

Wednesday, 28 December 2011

Cascading Drop Down SharePoint 2010

our new blog site : http://blog.hintechnology.com
Cascading Drop Down
The request for Cascading Drop Down, filtered drop down, dependent drop down or what you call them is one of the most common requirements from customers. This rather basic functionality is surprisingly not implemented in either WSS 3.0 or MOSS 2007.
What is Cascading Drop Down?
You have two columns in your SharePoint list, Country and City. Both are lookup/drop down columns. When you choose a country in the Country Drop Down, you only want to see the cities in this country available in the City Drop Down column. This of course makes life easier for the end user, and improves data quality.
The solution
Instead, I have used this solution with success. The list is still standard SharePoint, which gives great flexibility and stability. This way, the filtering is done in the forms for creating and editing elements. Because of this, you don’t even have access to the server to implement this. I have used this solution both in document libraries and in regular SharePoint lists.
1. Add the Jacascript
Download the Jquery file  http://ajax.googleapis.com/ajax/libs/jquery/1/jquery.min.js  by Jquery.com. Download jquery.SPServices-0.4.8.zip from the Jquery Library for SharePoint Codeplex site (newer version is probably also OK). Upload http://ajax.googleapis.com/ajax/libs/jquery/1/jquery.min.js and jquery.SPServices-0.4.8.min.js (from the zip file) to a document library that everyone accessing your site has access to (a library on the top level site can be wise).
2. Create your relationship lists
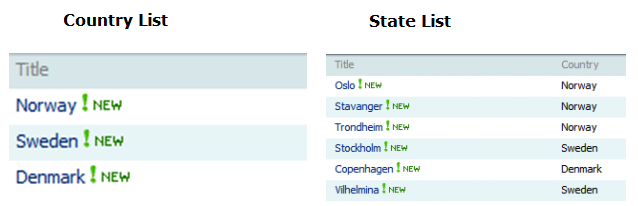
Make two lists, one for the parent (Country) and one for the child (City):


The Country column can be a look up from the Countries list, but you can just as well use a standard single line of text column. This can theoretically give better performance, but you must of course be precise when filling out the County column so that the values here matches the ones in the Countries list.
3. Create the list using the Drop Down

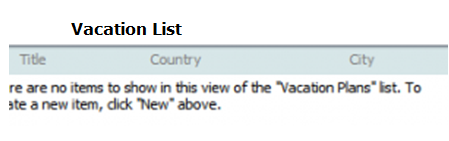
Vacation Plan List


Vacation Plans list:


This is the list where I want my Cascading Drop Downs. Country and City are lookup columns against Countries and Cities lists. The lookups goes against the title field in the respective columns.
4. Make the magic happen
In SharePoint Designer, create your own NewForm.aspx (or EditForm.aspx, you’ll need both if you want it to work when editing items).If you don’t know how to do this, I’ll probably post a tutorial later. Tip: don’t edit the existing forms, but copy them and assign them as default forms.
Just below
<asp:Content ContentPlaceHolderId="PlaceHolderMain" runat="server">
insert this code:
NOTE: For this you have to move into Advanced Mode of the page in Page code view side.
<script language="javascript" type="text/javascript" src="/address to document library/jquery-1.3.2.min.js"></script>
<script language="javascript" type="text/javascript" src="/address to document library/jquery.SPServices-0.4.8.min.js"></script>
<script language="javascript" type="text/javascript">
 $(document).ready(function() {
  $().SPServices.SPCascadeDropdowns({
   relationshipList: "Cities",
   relationshipListParentColumn: "Country",
   relationshipListChildColumn: "Title",
   parentColumn: "Country",
   childColumn: "City",
   debug: true
  });

 });
</script>

Save and create a new item using your new form:

Ajax Control Toolkit with SharePoint 2010

our new blog site : http://blog.hintechnology.com

Ajax Control Toolkit with SharePoint 2010

I had to use Ajax control toolkit with sharepoint and I had download the latest version from codeplex. We usually download latest versions of software because we believe that with latest version we can get more features and more bug-free. I had used Ajax Control Toolkit with SharePoint 2007 and it was much easier to configure and use Ajax Control Toolkit. With that belief in mind I had started using Ajax Control Toolkit in SharePoint 2010 downloading latest version for .net framework 3.5. But I failed  and after investigating I had found the following errors.
  • AjaxControlToolkit requires ASP.NET Ajax 4.0 scripts. Ensure the correct version of the scripts are referenced. If you are using an ASP.NET ScriptManager, switch to the ToolkitScriptManager in AjaxControlToolkit.dll.
  • Sys.registerComponent is not a function

The problem here is that latest versions of Ajax Control Toolkit is more optimized or targeted with .net framework 4.0. Even the Ajax control toolkit for .net framework 3.5 doesn’t work with SharePoint 2010. If you try to use Ajax Control Toolkit for 3.5 with SharePoint 2010, you may get the exceptions shown above.

How to make Ajax Control Toolkit working with SharePoint 2010?
Here are the steps to make Ajax Control Toolkit working with SharePoint 2010.
  1. Download Correct (compatible) version of Ajax Control Toolkit.
Since current release of Ajax Control Toolkit doesn’t work with SharePoint 2010, you need to download previous release. Maybe Ajax Control Toolkit team will address this issue and we’ll be able to use current Toolkit version with SharePoint in future. Until the current release is made compatible, please download the SharePoint 2010 compatible Ajax Control Toolkit from here.
  1. Add AjaxControlToolkit.dll reference to your project
To use the Ajax Control Toolkit in your SharePoint project, add reference to the AjaxControlToolkit.dll in your project. To use the Ajax Control Toolkit in any web part control add the following lines to register the Ajax Control Toolkit namespace.
<%@ Register Assembly="AjaxControlToolkit, Version=3.0.30930.28736,
 Culture=neutral, PublicKeyToken=28f01b0e84b6d53e"

Namespace="AjaxControlToolkit" TagPrefix="ajaxToolkit" %>
  1. Remember, here version 3.x version of Ajax Control Toolkit is used instead 3.5.
  2. Add Ajax Control Toolkit ScriptManager in master page.
Open the Master page in SharePoint Designer. By default the v4.Master file is the default master page can be found “_catalogs/masterpage” folder. Before modifying the master page, keep a backup copy.
    • First register the Ajax Control Toolkit namespace in the masterpage file by putting the following line at the top of the file:
<!--[if !supportLists]-->o    <!--[endif]--><%@ Register Assembly="AjaxControlToolkit, Version=3.0.30930.28736,
 Culture=neutral, PublicKeyToken=28f01b0e84b6d53e"

Namespace="AjaxControlToolkit" TagPrefix="ajaxToolkit" %>
    • Then remove the ScriptManager registration from the master page by removing the following line:
<!--[if !supportLists]-->o    <!--[endif]--><asp:ScriptManager id="ScriptManager" runat="server" EnablePageMethods="false" 
EnablePartialRendering="true" EnableScriptGlobalization="false" EnableScriptLocalization="true"/>
    • Finally Add the following line in place of the above line to register Ajax Control Toolkit
<!--[if !supportLists]-->o    <!--[endif]--><ajaxToolkit:ToolkitScriptManager id="ScriptManager" runat="server" EnablePageMethods="false"
EnablePartialRendering="true" EnableScriptGlobalization="false" EnableScriptLocalization="true"/>
  1. Register Ajax Control Toolkit namespaces in SharePoint package Designer 
Finally, you need to register the Ajax Control Toolkit namespace with SharePoint Package designer. Registering Ajax Control Toolkit namespaces will add Ajax Control Toolkit namespaces in web.config’s safecontrol list. First open the Package designer in Visual Studio (Package usually exists under Package folder in Visual Studio). And then click the “Advanced” button in package designer window as shown in the image below. In that advanced tab you can add/edit assemblies to be registered safe as part of the deployment of the solution package. Click Add ==> “Add Existing Assembly”. The following image shows wizard to follow.


Figure 1: Above Package Designer’s Advance tab
In the “Add existing Assembly” window, add the following namespaces for Ajax Control Toolkit.
Namespace
Type Name
Assembly Name
AjaxControlToolkit
*
AjaxControlToolkit
AjaxControlToolkit.Design
*
AjaxControlToolkit
AjaxControlToolkit.HTMLEditor
*
AjaxControlToolkit
AjaxControlToolkit.HTMLEditor.Popups
*
AjaxControlToolkit
AjaxControlToolkit.HTMLEditor.ToolbarButton
*
AjaxControlToolkit
AjaxControlToolkit.MaskedEditValidatorCompatibility
*
AjaxControlToolkit
The following image shows the “Add Existing Assembly” window for AjaxControlToolkit dll.


Figure 2: Add/Edit Existing Assembly window
Now you can build and deploy the package and as a result of deployment, Ajax Control Toolkit namespaces will be registered as safe controls in web.config.
Conclusion
Its really hard to believe that Ajax Control Toolkit’s  latest version doesn’t work with SharePoint. We expect to have the latest version of Ajax Control Toolkit to be compatible with SharePoint 2010. Until then we might have to use an old version of Ajax Control Toolkit.

For More Details you can visit : 
http://ranaictiu-technicalblog.blogspot.com/2010/08/ajax-control-toolkit-with-sharepoint.html