our new blog site : http://blog.hintechnology.com
Thank you for Reading Post.
Create and Deploy user Control of ASP.NET Solution in SharePoint
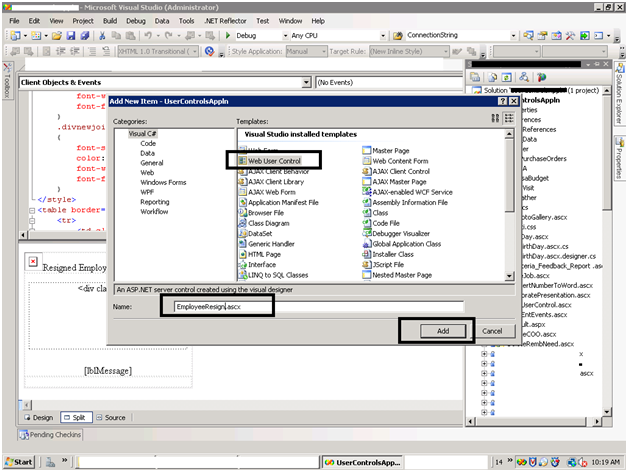
1. 1. Add User Control in Asp.net Application
2. Design your User Control with controls
3. you can have the Design of the Form
<style type="text/css">
.divMainJoinee
{
width: 260px;
margin: 0px;
padding: 0px;
}
.divnewjoin
{
float: left;
}
.divnewjoin-photo
{
margin: 2px;
padding-left: 10px;
float: left;
width: 75px;
height: 100px;
}
.divnewjoin-desc
{
float: left;
width: 160px;
height: 100px;
padding-left: 10px;
}
.divnewjoin-desc > p
{
line-height: 20px;
overflow: hidden;
padding-left: 5px;
margin: 0px;
font-size: 10px;
color: #294592;
font-weight: bold;
font-family: Verdana;
}
.divnewjoin-desc > p > a
{
font-size: 10px;
color: #294592;
font-weight: bold;
font-family: Verdana;
}
</style>
<table border="0" width="275px" cellpadding="0" class="birthbg" cellspacing="0">
<tr>
<td class="BDtblleft" style="font-size: 12pt; font-family: Frutiger LT 45 Light">
<img style="height: 30px; width: 30px" src="/SiteImageLibrary/resign_employee_png.png" alt="Resigned Employee!" />Resigned
Employee
</td>
</tr>
<tr align="center">
<td colspan="2">
<div style="text-align: center;" class="BDtblBody">
<asp:Repeater ID=" rptRegisnationEMP" runat="server">
<HeaderTemplate>
<div style="width: 260px; height: 140px; margin: 5px">
<marquee direction='up' onmouseover='this.scrollAmount=0' onmouseout='this.scrollAmount=2'
scrollamount="2" style='padding-top: 10px; height: 110px; padding-bottom: 10px;'>
<div class="divMainJoinee">
</HeaderTemplate>
<ItemTemplate>
<div class="divnewjoin">
<div class="divnewjoin-photo">
<img src='<%# Eval("EMP_PHOTO")%>' width="75px" height="100px" alt="Employee Name" />
</div>
<div class="divnewjoin-desc">
<p>
<a href='<%# Eval("EMP_EMAIL", "mailto:{0}" ) %>'>
<%# Eval("EMP_NAME")%>
</a>
<br />
DEPT :
<%# Eval("DEPT_NAME")%>
<br />
DESG :
<%# Eval("DESIG_NAME")%>
<br />
LAST WORKING DATE :
<%# Eval("EMP_LASTWORKINGDAY", "{0:dd/M/yyyy}")%>
</p>
</div>
</div>
</ItemTemplate>
<SeparatorTemplate>
<div style="clear: both;">
<br />
</div>
</SeparatorTemplate>
<FooterTemplate>
</div> </marquee> </div>
</FooterTemplate>
</asp:Repeater>
<asp:Label ID="lblMessage" runat="server" Text=""></asp:Label>
</div>
</td>
</tr>
<tr>
<td style="height: 5px;">
</td>
</tr>
</table>
4. The Code Behind File of the User Control Binds the Data to the Repeater Control
using System;
using System.Configuration;
using System.Data;
using System.Data.SqlClient;
namespace MyNameSpace
{
public partial class EmployeeResign : System.Web.UI.UserControl
{
#region User Control Level Variable
string ConnectionString = ConfigurationManager.AppSettings["ConnectionString"].ToString();
SqlConnection objConn;
SqlCommand objCmd;
#endregion
protected void Page_Load(object sender, EventArgs e)
{
if (!IsPostBack)
{
BindData();
}
}
#region Bind Data
protected void BindData()
{
objConn = new SqlConnection(ConnectionString);
try
{
objConn.Open();
objCmd = new SqlCommand("GETEMPRESIGNATION", objConn);
DataTable objtblResignatioEmp = new DataTable();
SqlDataAdapter objadpNewJoinee = new SqlDataAdapter(objCmd);
objadpNewJoinee.Fill(objtblResignatioEmp);
if (objtblNewJoinee.Rows.Count > 0)
{
rptRegisnationEMP.DataSource = objtblResignatioEmp
rptRegisnationEMP.DataBind();
}
else
{
lblMessage.Text = "No Record Found";
}
}
catch (Exception es)
{
lblMessage.Text = es.Message;
}
finally
{
objConn.Close();
}
}
#endregion
}
}
5. Build the Solution
6. Create User Control folder in the IIS Directory of the SharePoint Site.
7. Add your user control file in the “UserControls” files which you have recently created.
8. Deploy the Asp.NET DLL of the Solution in the GAC, and Add in the Web Config files of the sharepoint Site.
“<SafeControl Assembly="Put_Your_Assembly_Details", Version=1.0.0.0, Culture=neutral, PublicKeyToken=e28cff1753813c3e" Namespace="Your_Solution_Namespace" TypeName="*" Safe="True" />
9. Now Edit the SharePoint Page, where you want to add this user control, SMARTPART is one of the free Web Parts through which we can Add your usercontrol Directly so ADD SMARTPART Web Part in your Farm Solution, and Add the Smart Part Web Part in the Editing Page.


No comments:
Post a Comment